
Ultrasound probes are essential components of diagnostic imaging systems. Their condition can directly affect image quality, examination efficiency, and the reliability of diagnostic procedures. Regular inspection helps clinics identify visible damage, recognise early signs of malfunction, and determine when professional testing or repair may be necessary.
A structured ultrasound probe inspection checklist makes it easier for healthcare facilities to monitor probe condition, document issues, and establish consistent maintenance practices.
In this guide, we explain how to create a practical inspection checklist for your clinic, what to examine, and when to arrange professional ultrasound probe testing.
Why Is Ultrasound Probe Inspection Important?
Ultrasound probes are frequently handled, cleaned, disinfected, and connected to imaging systems throughout the working day. Repeated use can contribute to wear, cable damage, connector problems, and deterioration of the probe's acoustic lens.
Routine inspections can help clinics:
Identify visible damage before it worsens.
Recognise changes in image quality.
Detect cable, connector, and housing problems.
Maintain records of probe condition and maintenance.
Reduce unexpected equipment downtime.
Identify when professional diagnostics or ultrasound probe repair may be required.
Visual inspection alone cannot identify every internal fault. Combining routine checks with appropriate performance testing provides a more complete assessment.
1. Record the Ultrasound Probe Details
Begin the checklist by recording identifying information for every probe. This helps staff track inspection history, maintenance activities, and recurring problems.
Include the following details:
Manufacturer and probe model
Serial number or equipment identification number
Probe type, such as linear, convex, phased-array, or endocavity
Associated ultrasound system
Department or examination room
Inspection date and time
Name or initials of the staff member conducting the inspection
Keeping consistent records makes it easier to identify which probes require follow-up and when previous problems occurred.
2. Inspect the Probe Cable
The cable connects the probe to the ultrasound system and may experience repeated bending, pulling, and movement during examinations.
Check for:
Cuts, cracks, or damaged insulation
Kinks, twisting, or excessive bending
Exposed wires or unusual bulges
Loose connections near the probe housing
Intermittent operation when the cable is moved during normal handling
Do not deliberately bend, twist, or pull the cable to provoke a fault. If a problem appears during normal use, document it and arrange an appropriate technical assessment.
Cable damage may affect probe operation and could require professional ultrasound probe repair.
3. Check the Connector and Pins
The connector should be inspected before it is attached to the ultrasound system.
Look for:
Bent, damaged, or missing pins, where applicable
Cracks in the connector housing
Signs of corrosion or contamination
Damaged locking mechanisms
Loose or unstable connections
Never force a connector into a socket. Follow the manufacturer's instructions for handling, cleaning, and connecting the probe.
If the connector appears damaged, remove the probe from service according to your facility's procedures and request technical evaluation.
4. Examine the Acoustic Lens and Probe Surface
The acoustic lens is the patient-contact surface through which ultrasound signals are transmitted and received. Damage to this area may affect image quality and the probe's suitability for use.
Check for:
Cuts, cracks, or punctures
Peeling or separation of lens material
Swelling, deformation, or unusual surface changes
Damage to the probe housing
Signs of fluid ingress or contamination
Also inspect any strain relief, seams, and other accessible surfaces for deterioration.
Do not use a probe with damaged patient-contact surfaces until it has been assessed according to the manufacturer's instructions and your facility's infection-control procedures.
5. Review Cleaning and Disinfection Practices
Incorrect cleaning or disinfection can damage probe materials and create infection-control risks.
Your checklist should confirm that:
The approved cleaning procedure has been followed.
The disinfectant is compatible with the specific probe model.
Required disinfection levels are followed for the probe's intended use.
The probe is inspected after cleaning and disinfection.
No prohibited chemicals or cleaning methods have been used.
The probe is stored in an appropriate location when not in use.
Always follow the manufacturer's instructions for use. Endocavity and other specialised probes may have different cleaning and disinfection requirements from external probes.
6. Assess Image Quality and Probe Performance
A probe can look normal externally and still have an internal fault. For this reason, image quality should also be considered as part of the inspection process.
When appropriate and permitted by your facility's procedures, check for:
Unusual vertical or horizontal lines
Missing sections of the image
Reduced sensitivity or weak signal
Persistent artefacts that were not previously present
Uneven image quality across the field of view
Intermittent probe detection or operation
Compare the results with known normal performance and the manufacturer's guidance. Remember that image artefacts can also arise from the ultrasound system, settings, or examination conditions. A single symptom does not automatically confirm probe damage.
If abnormalities persist, arrange professional Ultrasound Probe Testing to investigate the possible cause.
7. Use a Standardised Ultrasound Probe Inspection Checklist
The following checklist can be adapted to your clinic's equipment and procedures.
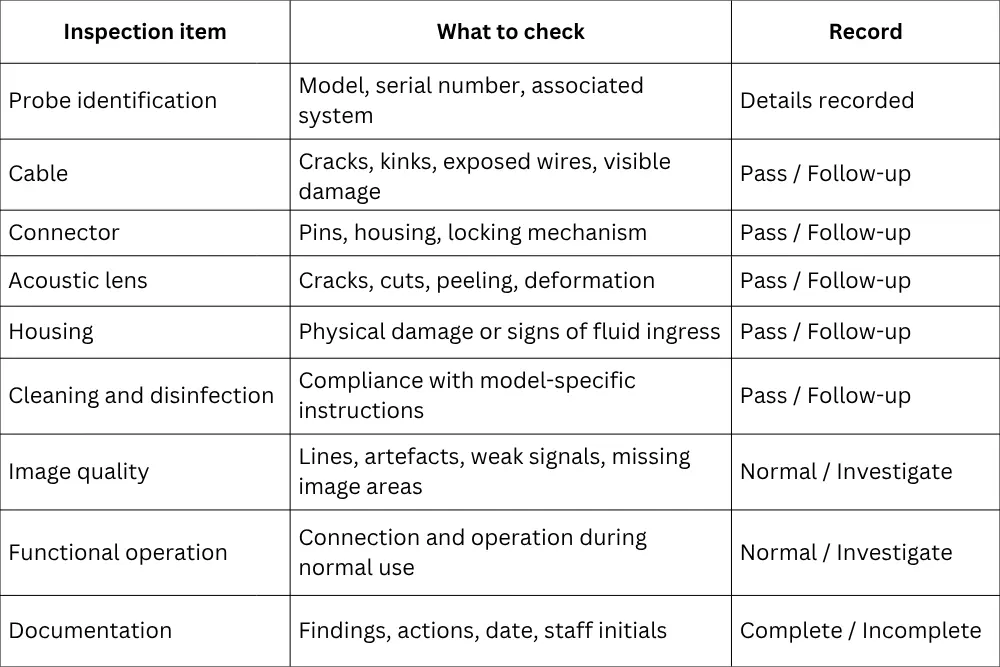
This checklist is a general starting point, not a substitute for manufacturer-specific inspection procedures or electrical and performance tests. Adapt it to the probe type, clinical application, and applicable facility policies.
8. Decide When Professional Testing Is Required
Some faults cannot be confirmed through visual inspection alone. Professional testing may be appropriate when:
Image quality changes unexpectedly.
The probe intermittently disconnects from the system.
Cable or connector damage is suspected.
The probe has experienced impact or possible fluid ingress.
Staff notice recurring artefacts.
A probe has undergone repair and requires post-repair evaluation.
There is uncertainty about the probe's functional condition.
Professional testing may include visual and physical assessment, investigation of reported faults, image-quality evaluation, and suitable performance checks. The exact tests depend on the probe model, reported symptoms, and available procedures.
9. Maintain a Probe Inspection Log
A checklist is more useful when the results are documented consistently. Maintain a separate record for each probe or use an equipment-management system.
Your inspection log should include:
Inspection date
Probe identification
Observed damage or abnormal behaviour
Images or supporting documentation, where appropriate
Action taken
Referral for testing or repair
Service report and return-to-use decision
Inspection frequency should reflect manufacturer recommendations, usage levels, the clinical environment, and your facility's risk-management policy. Staff should also report unexpected damage or changes in performance between scheduled inspections.
10. Arrange Ultrasound Probe Repair When Needed
If an inspection identifies damage or persistent performance concerns, the next step is to determine whether the probe can be repaired or requires another solution.
Probescan provides ultrasound probe diagnostics, testing, and repair assessments in the UAE. The service can assess compatible probes from multiple manufacturers, including GE Healthcare, Philips, Siemens, Samsung, Canon, and other brands, subject to model and service availability.
For example, Philips Ultrasound Probe Repair or GE Ultrasound Probe Repair may be considered when a compatible probe from either manufacturer develops a cable, connector, lens, or image-quality issue. Similar assessment options may be available for other supported brands.
The appropriate solution depends on the fault, probe model, condition, and repair feasibility.
Conclusion
A well-designed ultrasound probe inspection checklist helps clinics monitor equipment condition, record recurring issues, and identify when further evaluation is needed. Regular checks of cables, connectors, acoustic lenses, cleaning practices, and image quality can support a more consistent maintenance process.
However, visual inspection cannot detect every internal fault. When a probe shows persistent image artefacts, intermittent operation, or other performance changes, professional ultrasound probe testing can help determine the next step.
Probescan supports healthcare facilities across the UAE with ultrasound probe assessment, testing, and repair services for compatible models from multiple manufacturers.
Frequently Asked Questions
How often should an ultrasound probe be inspected?
Follow the manufacturer's recommendations and your facility's maintenance policy. A practical approach is to perform routine checks before or after use as appropriate, with additional inspections whenever damage or abnormal performance is reported.
Can visual inspection detect all ultrasound probe faults?
No. Visual inspection can identify external damage, but internal element failures and certain electrical or performance issues may require specialised testing.
What should I do if an ultrasound probe produces unusual lines?
Document the symptoms and check whether they persist under appropriate conditions. Since image artefacts can have several causes, arrange technical evaluation if the issue continues.
Can different ultrasound probe brands use the same inspection checklist?
A general checklist can cover common inspection points, but the exact procedures must be adapted to the manufacturer, probe model, intended use, and applicable instructions.
When should a clinic arrange ultrasound probe repair?
Seek professional assessment when there is visible damage, persistent image-quality deterioration, intermittent operation, or another suspected fault. Avoid using a probe that may be unsafe or unsuitable for clinical use until it has been assessed appropriately.